Ideally you will send us your request by program-menu "Help",
in case of problems send an email ....
Then the installation and user protocol is also sent to us
automatically as a zip file. You do not need to do anything
else.
By the way, the transferred data does not include any personal
information.
Customer Feedback
We at proDAD are happy to answer any questions you may have about our program.
-
Answer:
Please playback the Video [Links #1] .
-
Answer:
Please playback the Video [Links #1] .
-
Answer:
Please playback the Video [Links #1] .
Example
-
Answer:
The most popular and comfortable use of Heroglyph is as plugin in Premiere Elements or Pro.
Just create a title and place it in the Premiere Timeline - in the same way as known from the Premiere-own titler.
Don´t worry about the graphic format, Import and Export processes or eve Alphachannel!
The plugin solves this automatically for you!
The use as plugin is described as following:
Create a title:
On location [A], press right-mouse to open the context menu [Image #2]
Heroglyph will start up for the title editing. Once you created everything, press F12 to apply the title and to go back to premiere.
View title:
Drag the title-scene into the premiere timeline [B].
Further edit:
Double-click the title-scene [Premiere Timeline] [C] and "edit Title Image 3.
Context menu for [A]
If you wish to edit the title-duration in the premiere timeline directly, deactivate "use Heroglyph timebase".
Make sure that the option"Composite" is switched on to see the title over the video with matte.
-
Answer:
Mögliche Ursachen für Unschärfe:
- Export mit "optimieren für Video", weil dabei harte Übergänge geglättet werden
- der Codec verändert den Bildinhalt,
- die Bildgröße oder Fps im Export stimmen nicht mit dem Ziel überein
- bezieht sich die Unschärfe auf ein Bild, so muss dieser Fall genauer untersucht werden.
Abhilfe:
- Option "optimieren für Video" ausschalten
- Codec RAW verwenden [das bedeutet "kein Codec"]
- Bildgröße korrigieren/anpassen
-
Answer:
A full version or demo version of Heroglyph 2.5 is required for this Service Pack.
Please choose the right Service pack for your heroglyph version.
Note:
A Service Pack is not available for Heroglyph Rapid 2Links:
-
Answer:
Das Training Pack benötigt Heroglyph 2.6 oder höher.
Diese Version ist im Service Pack enthalten und kann einfach downgeloadet und installiert werden:
Heroglyph 2.5:
Service Pack [Link #1] installieren.
Heroglyph 1.0 oder 2.0:
Heroglyph 2.6 Demoversion installieren [Link #2]Links:
-
Answer:
Ändern Sie die Anzeigeart der einzelnen Timelineobjekte wie folgt beschrieben.
Anzeige als "Tabelle" aktivieren.
Wichtig:
In den Eingabe-Modus wechseln.
"Anzeigeart" wählen (wirkt sich nur auf überlappende Folien aus)
Solid:
ohne transparents, nicht durchsichtig
Muster:
Hintergrundobjekte bzw. generell andere nicht aktive Timelineobjekte werden mit einem Muster versehen und somit milchig dargestellt.
transparent:
Alle Timelineobjekte werden komplett dargestellt. Allerdings wird so eventuell schwerer erkennbar, welches Objekt gerade bearbeitet wird bzw. aktiv ist!
-
Answer:
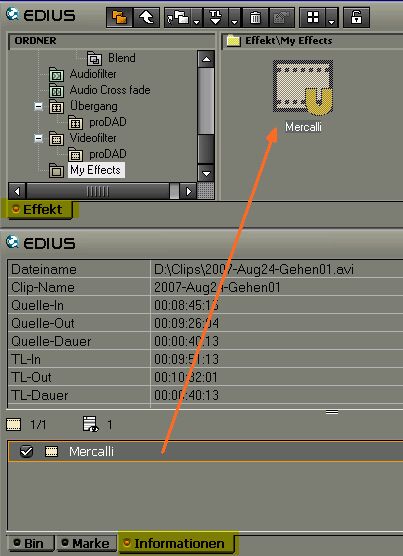
Just create an effect in the Edius timeline by applying the icon to the timeline. Customize the effect settings.
Now drag the effect from the 'information' palette with holded left mouse and drop it in the window "effect" in the right side area.
Tip:
In case you need to sort in this preset into a specific Edius folder, please open the category before dragging the effects icon.
Then you might localize your effect settings more comfortable in future.
And yu also can create a proDAD favourite effects library within EDIUS.
The arrow shows where the effects icon needs to be dropped. The result will be a new effect template.
-
Answer:
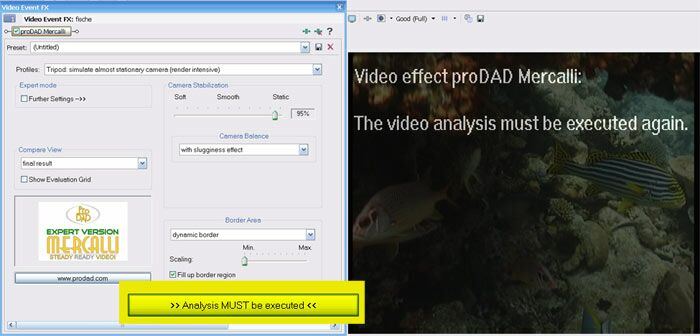
If Mercalli is assigned as filter for the first time, the video data needs to be analysed first.
For that purpose just mouse click on the button as shown in [Image #1] .
The Videoanalysis starts and the text in the video preview disappears.
Further information about Analysis and Stabilisation is available in the program's help (Press 'F1' Key to display the help).
Just click this (here color-marked) button to start the video analysis. (Screenshot here from Sony Vegas, also valid for other editing solutions such as Canopus Edius)